Mastering Roblox text buttons is crucial for any aspiring game developer, whether you are crafting an immersive RPG or a simple social hangout. This comprehensive guide dives deep into how to create, customize, and script interactive text buttons in Roblox Studio, addressing common challenges faced by busy adult gamers. We cover everything from initial setup and property adjustments to advanced scripting for various functionalities like click detection, UI animations, and data manipulation. Discover practical tips to enhance user experience, troubleshoot common errors, and optimize your game's interface for seamless player interaction across all devices. This article helps you efficiently build polished, engaging UI elements, saving you time and boosting your game's appeal, allowing you to balance your passion for creation with life's demands. Learn to make your Roblox game not just functional but truly captivating, making every development session count.
How do I create a functional Text Button in Roblox Studio for my game?
Creating a functional Text Button in Roblox Studio begins by adding a 'ScreenGui' to 'StarterGui', then inserting a 'TextButton' into that 'ScreenGui'. Position and size it within the workspace, then customize its appearance using properties like `Text`, `TextColor3`, `BackgroundColor3`, `TextSize`, and `Font`. To make it interactive, add a 'LocalScript' as a child of the TextButton and write code that connects to its `MouseButton1Click` event, defining what happens when a player presses it. For example, `script.Parent.MouseButton1Click:Connect(function() print("Button Clicked!") end)` will make it print a message to the output.
What are the essential properties I should customize for an effective Roblox TextButton?
For an effective Roblox TextButton, focus on `Text` for clear labeling, `TextSize` and `Font` for readability, and `TextColor3` with `BackgroundColor3` for visual appeal and branding. `BorderSizePixel` and `BorderColor3` can add definition, while `TextScaled` allows the text to automatically fit the button's size, crucial for responsive UIs. Don't forget `Active` (should be true for interactivity), and `AnchorPoint` and `Position` for precise placement, especially when scaling UIs for various devices, including the prevalent mobile gaming audience (which accounts for over 60% of US gamers regularly accessing Roblox).
How can I script a TextButton to change a player's stats or open a new UI element?
To script a TextButton to change player stats or open UI, you typically use a 'LocalScript' within the button. For UI changes, connect `MouseButton1Click` to a function that toggles the `Visible` property of another UI element or frame. For player stats, since stat changes often involve server-side logic (to prevent exploits), you'd use a `RemoteEvent`. The LocalScript would `FireServer()` the event when the button is clicked, and a 'Script' on the server would listen for that event and safely update the player's data, ensuring security and proper data handling.
What common issues arise when using Roblox TextButtons and how can I troubleshoot them?
Common issues with Roblox TextButtons include non-responsive clicks, incorrect visual appearance, or unexpected behavior. If a button isn't clicking, check if `Active` is true, if the `LocalScript` is a child of the button, and for any script errors in the output. Visual issues often stem from overlapping UI elements, incorrect `ZIndex` (higher ZIndex appears on top), or misconfigured properties like `BackgroundTransparency` or `TextTransparency`. Always test on multiple device types to catch scaling or touch input problems, as cross-device compatibility is key for a wide player base.
How do I implement hover effects or simple animations for a TextButton to enhance user experience?
Implementing hover effects for TextButtons significantly improves user experience and feedback. In a 'LocalScript', connect to the `MouseEnter` and `MouseLeave` events. For `MouseEnter`, change properties like `BackgroundColor3` to a lighter shade or `TextSize` to slightly larger. For `MouseLeave`, revert these properties. For simple animations, you can use `TweenService` to smoothly transition between property values, such as fading the background color or resizing the button with `TweenSize` or `TweenPosition`. This makes UI feel more polished and responsive to player input.
Can Roblox TextButtons be used to navigate between different screens or menus in my game?
Absolutely, Roblox TextButtons are ideal for navigating between different screens or menus. You can design various `ScreenGui` elements for different menus (e.g., 'MainMenuGui', 'ShopGui', 'SettingsGui'). When a TextButton is clicked, its associated 'LocalScript' can set the `Visible` property of the current `ScreenGui` to `false` and the target `ScreenGui` to `true`. This creates a seamless transition between game interfaces. For more complex navigation, consider a central UI management script that handles visibility and layering of multiple UI frames or ScreenGuis based on button clicks, providing a robust menu system.
What are the security considerations when using TextButtons, especially for in-game purchases or critical actions?
Security is paramount when TextButtons trigger critical actions like in-game purchases, stat resets, or item grants. Always assume client-side (LocalScript) input is untrustworthy. When a TextButton initiates such an action, the 'LocalScript' should only `FireServer()` a `RemoteEvent` with minimal, validated information. The actual logic for applying purchases, modifying stats, or granting items MUST reside in a 'Script' on the server. The server can then perform checks (e.g., does the player have enough currency? is this action valid?) before executing the change, preventing exploiters from manipulating game economics or player data.
Are you a busy gamer who loves diving into Roblox creation after a long day, but often finds yourself short on time to build those polished, intuitive user interfaces? You're not alone. Many of us balance careers, families, and life's demands, yet still crave that creative outlet and the joy of seeing our virtual worlds come to life. The frustration of a clunky, unresponsive in-game menu or a button that simply doesn't work can quickly derail a valuable evening of development. We all want our players to have a smooth, enjoyable experience, but sometimes getting the UI just right feels like a monumental task.
With an estimated 87% of US gamers regularly playing and spending an average of 10+ hours a week in their digital playgrounds, the demand for high-quality, user-friendly experiences is higher than ever. And with mobile gaming dominating, accounting for a significant portion of Roblox's player base, creating responsive and clear user interfaces is no longer optional—it's essential. This month's trends continue to highlight the importance of seamless social interaction and intuitive navigation within games, making your UI a critical component of player retention and enjoyment.
That's why mastering the Roblox Text Button is such a game-changer. It's one of the most fundamental yet powerful elements in your UI toolkit, capable of everything from simple menu navigation to complex in-game interactions. This guide is crafted specifically for you—the dedicated adult gamer and creator—to cut through the noise, solve common pain points, and equip you with the knowledge to efficiently create, customize, and script robust Roblox Text Buttons. We're here to help you build stunning UIs, maximize your limited development time, and ultimately create more engaging, successful Roblox games that players will love to click.
What is a Roblox Text Button and Why is it Essential for Your Game?
A Roblox Text Button is a fundamental UI element designed to display text and respond to player interaction. Think of it as the digital switchboard of your game, allowing players to perform actions like opening menus, purchasing items, starting quests, or changing settings. It resides within a ScreenGui, which is essentially a container for all your game's user interface components that appear on the player's screen. Its essence lies in its simplicity and versatility. Unlike ImageButtons, Text Buttons are primarily text-based, making them ideal for clear, direct communication with your players.
Their essential nature comes from several factors. Firstly, they provide clear instructions and feedback. Players instantly understand what an action button labeled "Play Game" or "Buy Item" will do. Secondly, they are highly customizable, allowing you to match your UI's aesthetics to your game's theme, which is crucial for immersion. Lastly, they are the backbone of interactivity, enabling players to navigate complex systems and engage with game mechanics. Without well-implemented Roblox Text Buttons, even the most brilliant game concepts can fall flat due to a lack of accessible control, leading to player frustration and ultimately, lower engagement—something no busy developer wants after investing precious time.
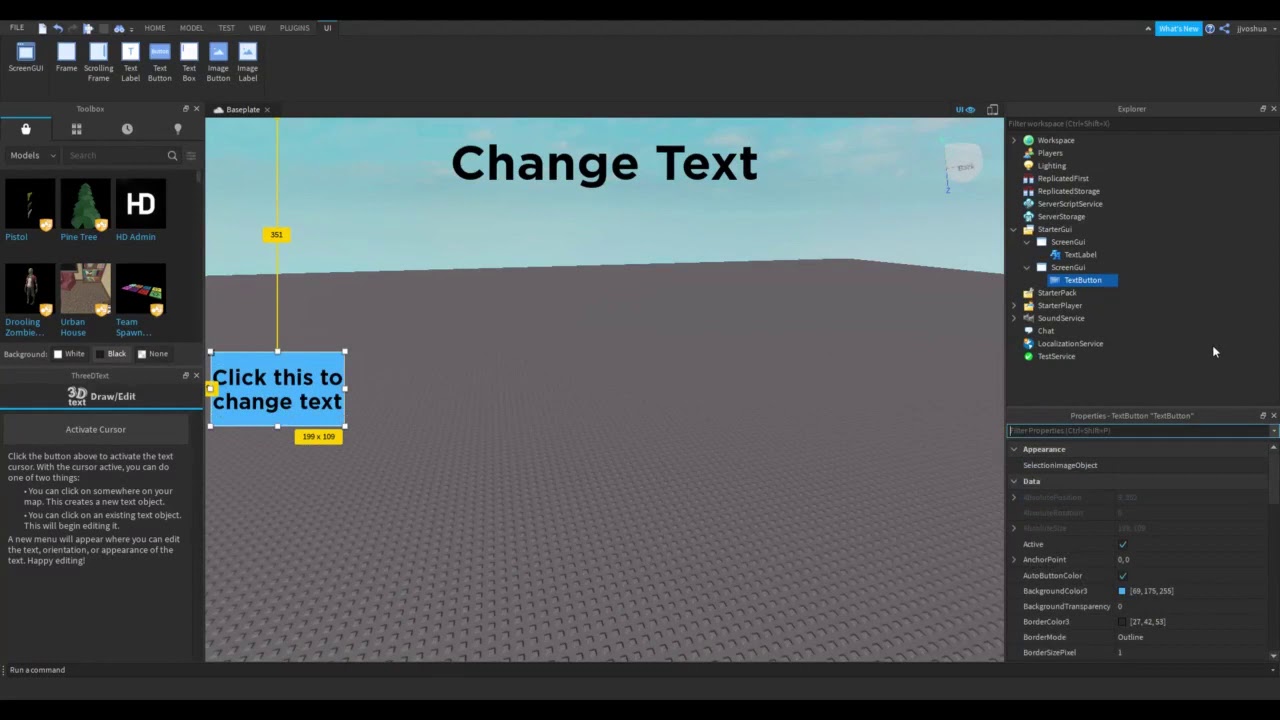
How Do I Create a Basic Roblox Text Button in Studio?
Creating a basic Roblox Text Button is a straightforward process, even if you're new to Studio. Here's a step-by-step breakdown:
Open Roblox Studio: Launch Studio and open your game project or create a new one.
Add a ScreenGui: In the 'Explorer' window, find 'StarterGui'. Hover over it, click the '+' icon, and search for 'ScreenGui'. This is the container for all your UI.
Insert a TextButton: Now, hover over the newly created 'ScreenGui' in Explorer, click '+', and search for 'TextButton'. A default button will appear on your screen.
Position and Size: Select the 'TextButton' in Explorer. In the 'Properties' window, you'll see 'Position' and 'Size'. You can drag the button directly on screen using the 'Select' tool, or for precise control, use 'UDim2' values. For example, a 'Size' of `{0.2, 0}, {0.1, 0}` means 20% width and 10% height relative to the screen. For consistent scaling across devices, utilizing 'Scale' (the first number in UDim2 pairs) is often preferred over 'Offset' (the second number).
Customize Text: In the 'Properties' window, scroll down to the 'Text' section. Change the 'Text' property to something meaningful, like "Start Game". Adjust 'TextColor3', 'TextSize', and 'Font' to make it readable and visually appealing. You can also tick 'TextScaled' to have the text automatically resize to fit the button.
Congratulations, you now have a visible Roblox Text Button! The next step, making it actually do something, is where the real fun begins with scripting.
What are the Key Properties for Customizing a Text Button's Look?
Customizing the appearance of your Roblox Text Button is crucial for creating an engaging and consistent user interface. The 'Properties' window in Roblox Studio is your best friend here. Here are the key properties you'll interact with most often:
Text: This is the literal string displayed on your button. Keep it concise and clear for the player.
TextSize & Font: Control the size and typeface of your text. Roblox offers a variety of fonts; choose one that matches your game's aesthetic and remains legible. For instance, 'SourceSansBold' is a popular choice for clarity.
TextColor3: Sets the color of the text. Use contrast effectively to ensure readability against the button's background.
BackgroundColor3: Defines the background color of the button itself. This is a primary way to make your buttons stand out or blend in.
BackgroundTransparency: Controls the button's transparency. A value of 0 means fully opaque, 1 means fully transparent. Useful for creating invisible click areas or unique visual styles.
BorderColor3 & BorderSizePixel: These control the color and thickness of the button's border. A subtle border can help define button edges, especially against busy backgrounds.
TextScaled: When true, the text will automatically scale to fit the button's size without overflowing. This is a lifesaver for responsive UI design, ensuring your text looks good on both large PC monitors and smaller mobile screens, where many US gamers enjoy Roblox.
AnchorPoint & Position: Essential for responsive UI. `AnchorPoint` defines the point on the UI element (0,0 is top-left, 0.5,0.5 is center) around which its `Position` is calculated. Using `AnchorPoint` with `Position` values in 'Scale' helps your UI adapt correctly to different screen resolutions, preventing elements from going off-screen on smaller devices.
ZIndex: Determines the stacking order of UI elements. A higher `ZIndex` value means the element will appear on top of others with lower `ZIndex` values, preventing your buttons from being hidden behind other UI components.
Experimenting with these properties allows you to craft visually appealing and functional Roblox Text Buttons that enhance your game's overall presentation and user experience.
How Do I Script a Roblox Text Button to Respond to Clicks?
Making your Roblox Text Button interactive is where the magic happens, and it's surprisingly simple with a 'LocalScript'. Here's how to connect an action to a button click:
Insert a LocalScript: Select your 'TextButton' in the Explorer. Click the '+' icon next to it and search for 'LocalScript'. A new script will appear as a child of your button. Remember, client-side interactions (like UI clicks) typically use 'LocalScripts'.
Reference the Button: Inside the 'LocalScript', you'll want to get a reference to the button it's parented to. You can do this with `local myButton = script.Parent`.
Connect to MouseButton1Click: The `MouseButton1Click` event is what fires when a player clicks (or taps on mobile) the button. You connect a function to this event using the `Connect` method.
Define the Action: Inside the function you've connected, write the code for what you want the button to do. For example:
local myButton = script.ParentmyButton.MouseButton1Click:Connect(function()print("Button 'Start Game' clicked!")-- Add your desired action here, e.g., open another UI, teleport player, etc.end)
This basic structure allows you to execute any client-side code when the button is pressed. For server-side actions, like changing a player's money or stats, you'll use a `RemoteEvent` to communicate securely from the 'LocalScript' to a 'Script' on the server. Always remember that any game-critical logic should ultimately be handled on the server to prevent exploits.
What are Common Animation Techniques for Text Buttons?
Adding animations to your Roblox Text Buttons transforms them from static elements into dynamic, engaging components that provide instant feedback and enhance the player's experience. This is especially vital for the 60% of US gamers who regularly play on mobile, where visual cues are often more impactful than complex text instructions. Here are some common techniques:
Hover Effects: Use `MouseEnter` and `MouseLeave` events in a 'LocalScript' to change properties like `BackgroundColor3`, `TextSize`, or `BorderSizePixel` when a player's cursor hovers over the button. This subtle change signals interactivity. Example: make the button slightly lighter on `MouseEnter` and revert on `MouseLeave`.
Click Feedback: Beyond just the action, a visual 'squash' or 'pop' effect when clicked makes the button feel more responsive. You can briefly change the `Size` or `Position` (making it slightly smaller or pushing it down) on `MouseButton1Click` and then quickly return it to normal. `TweenService` is perfect for smooth transitions here.
Tweening Properties: Roblox's `TweenService` is a powerful tool for creating smooth, interpolated changes to UI properties over time. Instead of instantly snapping a color or size change, TweenService can animate it beautifully. You can tween `BackgroundColor3`, `TextTransparency`, `Size`, `Position`, and even `Rotation` for more elaborate effects. This creates a professional and polished feel, making your game's UI stand out.
Bounce/Elastic Effects: Combine TweenService with different `EasingStyles` (like `Elastic` or `Bounce`) and `EasingDirections` to create playful, dynamic animations for button presses or menu openings. Just be mindful not to overdo it, as too many jarring animations can become distracting rather than helpful.
Implementing even simple animations can greatly elevate your UI, making interaction with your Roblox Text Buttons more satisfying and intuitive for players of all ages and device preferences.
How Can I Optimize Text Button Performance for Mobile Gamers?
Optimizing Roblox Text Button performance, especially for the massive mobile player base, is crucial for a smooth user experience. Laggy UIs can quickly lead to player churn. Here’s how you can keep your buttons snappy:
Minimize Scripting: While powerful, extensive client-side scripting, especially in loops or frequently firing events, can impact performance. Ensure your button scripts are efficient and only run logic when necessary. Avoid connecting multiple heavy functions to a single `MouseButton1Click` if possible.
Efficient Animations: Use `TweenService` for animations instead of manually updating properties in loops (e.g., `while true do`). TweenService is optimized and runs off the rendering thread, leading to smoother animations with less performance overhead. Stick to simpler tweens rather than complex, multi-property animations if performance is a bottleneck.
Texture and Font Choices: While TextButtons are primarily text, their containers or parent UI elements might use textures. High-resolution textures, especially if unoptimized or frequently loaded, can consume memory. For TextButtons, consider the font. While Roblox handles fonts efficiently, using many different custom fonts could subtly increase memory usage. Stick to a few core fonts for consistency and performance.
Use `AutomaticSize` Wisely: The `AutomaticSize` property can be helpful, but if applied to a deep hierarchy of UI elements that constantly resize each other, it can cause performance hitches as the engine recalculates layouts. Use it on individual elements where needed, but be cautious with cascading `AutomaticSize` changes.
`ZIndex` and UI Hierarchy: While not a direct performance hit, an overly complex UI hierarchy with many overlapping elements and frequent `ZIndex` changes can subtly increase rendering complexity. Keep your UI elements organized and simplify their hierarchy where possible. Ensuring your TextButtons are not unnecessarily nested deep within many frames can help render times.
By focusing on efficient scripting, optimized animations, and careful UI construction, you can ensure your Roblox Text Buttons provide a seamless, lag-free experience across all devices, particularly for players on less powerful mobile hardware.
What are Best Practices for Organizing Text Button UI in Explorer?
A well-organized UI hierarchy in the Explorer window is a gift to your future self and any collaborators. It speeds up development, makes debugging easier, and ensures scalability. When dealing with Roblox Text Buttons and other UI elements, adopting these best practices will save you headaches:
Group Related Elements in Frames: Don't leave individual buttons floating directly under 'ScreenGui'. Instead, create `Frame` objects (or `ScrollingFrames`, `UIPageLayout` etc.) to logically group related buttons. For example, a 'MainMenuFrame' could contain all your 'Play', 'Settings', and 'Exit' buttons. A 'ShopFrame' would house 'Buy' buttons for different items.
Meaningful Naming: Give your 'ScreenGuis', 'Frames', and especially your TextButtons descriptive names. Instead of "TextButton1", use "PlayGameButton" or "OpenShopButton". This makes it immediately clear what each element does, preventing confusion when your game grows in complexity.
Use Folders for Scripts: If you have multiple scripts related to a UI element (e.g., a LocalScript for interaction, another for animations), consider putting them in a 'Folder' within the UI element for neatness. This is less common for simple buttons but useful for complex UI components.
Consistent Naming Conventions: Decide on a naming convention (e.g., CamelCase, PascalCase) and stick to it. This creates a uniform structure that's easy to navigate. For instance, 'OpenSettingsButton' versus 'settings_button_open'. Consistency is key.
Leverage `ZIndex` Correctly: Use `ZIndex` to control the layering of overlapping UI elements. Higher `ZIndex` values render on top. Plan your UI layers to avoid elements being accidentally hidden behind others. This is critical for pop-up windows or layered menus where Roblox Text Buttons need to be interactive.
By maintaining a clean and logical structure in your Explorer, you'll find it far easier to manage, update, and debug your game's user interface, allowing you to spend more time on gameplay and less on untangling UI spaghetti.
How Do I Implement Advanced Functionality Like Confirmation Dialogs with Text Buttons?
Implementing advanced functionality like confirmation dialogs using Roblox Text Buttons elevates your game's professionalism and prevents accidental player actions (like spending premium currency). This involves creating a secondary UI element that appears when a primary button is clicked, requiring further confirmation. Here's a common approach:
Create a Confirmation Frame: Design a new `Frame` (e.g., "ConfirmPurchaseFrame") that contains a 'TextLabel' for the question (e.g., "Are you sure you want to buy this item for 50 Robux?") and two Roblox Text Buttons: "Yes" and "No". Set this frame's `Visible` property to `false` initially.
Primary Button Action: In the 'LocalScript' of your primary button (e.g., "BuyItemButton"), instead of directly triggering the purchase, set the `ConfirmPurchaseFrame.Visible` to `true` when clicked. You might also update the 'TextLabel' within the confirmation frame to be specific to the item being purchased.
Confirmation Button Logic:
"Yes" Button: In its 'LocalScript', connect to `MouseButton1Click`. This script will then `FireServer()` a `RemoteEvent` to the server, confirming the purchase. After firing, set `ConfirmPurchaseFrame.Visible` back to `false`.
"No" Button: In its 'LocalScript', connect to `MouseButton1Click`. This script will simply set `ConfirmPurchaseFrame.Visible` to `false`, effectively canceling the action without any server interaction.
Server-Side Validation: On the server, a 'Script' listens for the `RemoteEvent` fired by the "Yes" button. This server script performs all necessary checks (e.g., player's currency, item availability) and then processes the purchase. This separation of concerns is vital for security, as 2026 gaming trends emphasize robust anti-cheat measures.
This pattern provides a critical layer of user feedback and protection, making your game feel more secure and user-friendly, a key factor for retaining players, especially those balancing their gaming budget with real-life expenses.
What are Common Troubleshooting Tips for Roblox Text Buttons?
Even seasoned developers run into issues with Roblox Text Buttons. When your button isn't behaving as expected, systematically checking these common troubleshooting points can save you a lot of time and frustration:
Is `Active` Property True? The most common oversight! For a TextButton to respond to clicks, its `Active` property in the 'Properties' window MUST be set to `true`. If it's false, no events will fire.
Script Location: For client-side interactivity, the 'LocalScript' should be a direct child of the 'TextButton' or a UI element that can access it (e.g., a parent frame). If it's in 'StarterPlayerScripts' or 'ServerScriptService', it won't directly respond to a UI button click unless you've set up explicit references.
Output Window Errors: Always check the 'Output' window in Studio. Lua syntax errors, attempts to index nil values, or problems with event connections will often be reported here, pointing you directly to the problem line in your script.
`ZIndex` and Visibility: Is another UI element covering your button? Check the `ZIndex` property. An element with a higher `ZIndex` will render on top. Also, ensure the button itself and all its parent frames (ScreenGui, any Frames) have their `Visible` property set to `true`.
Anchored GUI Objects: Sometimes, UI elements can become unexpectedly fixed to a specific spot if their `AnchorPoint` and `Position` aren't configured for responsive scaling. If your button disappears or moves off-screen on different resolutions, review these properties.
`CanCollide` and `Selectable`: While less common for TextButtons, ensure `CanCollide` and `Selectable` properties of the button's parents are not interfering. For UIs, these usually aren't an issue, but if you've nested UI inside 3D objects, they might become relevant.
RemoteEvent Issues: If your button uses `RemoteEvents` for server communication, check both the 'LocalScript' (for `FireServer()`) and the 'Script' (for `OnServerEvent:Connect()`). Ensure the event names match exactly and that the server script is correctly processing the data.
Troubleshooting is a critical skill for any developer. By methodically checking these common areas, you'll quickly identify and resolve most issues with your Roblox Text Buttons, keeping your development flow smooth and your game reliable.
How Can I Make My Text Buttons Stand Out with Modern UI Trends?
Staying current with modern UI trends helps your Roblox game feel fresh, professional, and appealing to a broad audience, including tech-savvy Gen Z and Millennials. Here’s how to make your Roblox Text Buttons stand out:
Minimalism and Clean Design: Less is often more. Embrace clean lines, ample negative space, and uncluttered layouts. Use icons alongside or instead of text (where appropriate) for universal understanding. This "cozy game" aesthetic is popular this month, focusing on inviting, stress-free user experiences.
Subtle Gradients and Shadows: Instead of flat colors, use subtle linear or radial gradients for `BackgroundColor3` to add depth. Drop shadows (achieved with a slightly offset, darker `Frame` behind the button or `UICorner` + `UIStroke` with transparency) can make buttons pop without being overly flashy.
Rounded Corners (UICorner): Square buttons can look dated. Adding a `UICorner` object as a child of your TextButton creates beautifully rounded corners, instantly giving your UI a softer, more modern feel. Experiment with different `CornerRadius` values.
Effective Feedback: Beyond simple color changes, use TweenService for smooth hover and click animations. A slight scaling up on hover or a gentle "squash and stretch" on click provides delightful micro-interactions. Consider subtle particle effects on important button clicks for high-impact actions.
Accessibility: Design with accessibility in mind. Ensure high contrast between text and background colors for readability. Use sufficiently large `TextSize` and `TextScaled` for legibility on all devices. This inclusive approach benefits all players, especially those who game to unwind after work and value clear communication.
Themed Icons: If using text alone, consider a custom TextButton that combines a 'TextLabel' and an 'ImageLabel' within a Frame to create unique, themed button icons that resonate with your game's art style, reflecting the rising influence of creators and streamers on visual trends.
By incorporating these modern UI principles into your Roblox Text Button design, you can create interfaces that are not only functional but also visually striking and intuitive, greatly enhancing your game's overall appeal and player engagement in the competitive 2026 gaming landscape.
FAQ: Quick Answers to Your Roblox Text Button Questions
Can I use images instead of text in a Roblox TextButton?
Yes, while primarily for text, you can overlay an ImageLabel or use its BackgroundTransparency with a TextLabel sibling within a Frame to achieve image-like buttons. Alternatively, use an ImageButton directly if only an image is needed.
How do I make a TextButton change color when hovered over?
You can use a local script with MouseEnter and MouseLeave events to change the button's BackgroundColor3 property, creating an interactive hover effect. TweenService can be used for smooth color transitions, adding a polished feel.
What's the best way to handle multiple TextButtons with similar actions?
Consider using a single event listener for a parent frame, leveraging `button.Name` or `button.Text` within the script to differentiate actions. Alternatively, connect each button's MouseButton1Click to a function that takes the clicked button as an argument for shared logic.
Why isn't my Roblox TextButton click script working?
Check the script's location (should be LocalScript under the button), ensure the button's Active property is true, and verify there are no syntax errors in your MouseButton1Click connection. The Output window usually provides clues to script issues.
Can I create a TextButton that only works for specific players?
Yes, within your LocalScript's click function, you can add conditional logic that checks `game.Players.LocalPlayer.Name` or Group ID against a predefined list before executing the button's action. For sensitive server actions, validate permissions on the server too.
How do I reset a TextButton's visual state after an action?
After a button action, especially if it involved animations or temporary visual changes (like dimming), ensure you revert its properties. If using TweenService for animations, tween it back to its original state. For simple property changes, set them back directly in the script.
Conclusion: Mastering Your Roblox Text Buttons for Engaging Experiences
You've now got a comprehensive toolkit for creating, customizing, and scripting dynamic Roblox Text Buttons. From the initial drag-and-drop in Studio to advanced scripting for confirmation dialogs and optimizing for mobile performance, we've covered the essentials that empower you to build truly engaging user interfaces. Remember, even with limited time, focusing on clear design, responsive interactions, and secure logic makes all the difference. Your dedication to crafting polished UIs directly translates into a more enjoyable and sticky experience for your players, fostering a loyal community that appreciates your efforts.
The beauty of Roblox development lies in its accessibility combined with immense power. By understanding and applying these principles, you're not just making buttons; you're building bridges for players to explore your creative visions. So, take these tips, experiment, and refine your UI skills. What's your biggest UI challenge in Roblox, or what's a cool Text Button trick you've discovered? Comment below and share your insights with our fellow adult gamers and creators!
Effortlessly create and customize Roblox Text Buttons. Learn essential scripting for interactive UI elements. Optimize button performance and user experience. Troubleshoot common UI development issues. Balance game creation with real-world commitments.
35


Roblox Font Generator Text Effects 2582 Fd329 . Tulisan Roblox Studio 2026 Font Generator Text Effects 3706 5008e . Roblox Font Generator Text Effects 1579 4c70c . Button Clicked Roblox Tutorial Making A Clickable Part QGRMH . Roblox Criminality Script 2026 Aimbot New Font Generator Text Effects 4042 9b139


Trident Survival Roblox Script 2026 V5 Fonts Free Download 14186.webp. Animatronic Nights Roblox Value List Font Generator Text Effects 2026 84e6b . Roblox Basketball Zero Codes June 2026 TechWiser Redeem Roblox Basketball Zero Codes. Tulisan Roblox Studio 2026 3611 7da4c . Roblox Studio Free Models Menu


Roblox Text Effect Generator ROBLOX.webp. Roblox 2026 Logo REVEALED New Color New Look YouTube Maxres2 . Roblox 2026 Logo YouTube Oardefault . New In Experience Text Chat System Public Release Page 11 . How To Message On Roblox 2026 A Quick Guide


Should The Text Button UI Have Buttons Art Design Support . Roblox White Text Logo With Symbol PNG Icon Image ID 489312 TOPpng . Roblox Font Generator MockoFUN Roblox Font Generator 79818 . How To Edit Text In Roblox Studio Tutorial YouTube . HOW TO MAKE A NICE LOOKING GUI TEXT BUTTON Roblox Studio Tutorial


How To Make A TELEPORT BUTTON Roblox Studio Guide YouTube . How To Make A Text Button That Opens Up A Frame In Roblox Studio YouTube . Roblox Font Generator Text Effects 3398 689f9.webp. 2026 3D With Blue Glow Text Effect Generator 2026 Logo 275 12349.webp. How To Make A BUTTON In Roblox Studio YouTube


Roblox Text Effect Generator TextStudio Roblox.webp. UPDATED PLUGIN Epic UI Pack User Interface Assets Community . Click Button To Change Text Roblox Studio 2024 YouTube . How To Make A Text Button That Opens A Frame In Roblox Studio YouTube Hqdefault . UPDATED PLUGIN Epic UI Pack User Interface Assets Community 2 690x108


Roblox Community Cover Text Effects Editable Designs PSD Vectors And. How To Add A Icon Adjacent To Text Community Tutorials Developer . Roblox Flex UGC Codes May 2026 TechWiser Redeem Roblox Flex Ugc Codes. 2025 Telekinesis Script Roblox Universal Telekinesis Fe Telekinesis Script Roblox 1.webp. How To Animate Button Roblox Studio YouTube