Are you a Roblox developer or a keen player looking to fine-tune your creations? Understanding the anchorpoint position in Roblox Studio is a game-changer for building stable, interactive, and visually appealing experiences. Many gamers, especially those balancing work and family, want to maximize their limited creative time, and grappling with object stability can be a major time sink. This guide cuts through the complexity, offering practical insights and actionable steps to utilize anchorpoint position effectively. Discover how this fundamental property impacts everything from user interface elements to dynamic in-game objects, preventing common development headaches. Learn to create smoother animations, more reliable UI, and robust structures without unexpected wobbles or shifts. We cover best practices for developers seeking to optimize performance and deliver polished content, ensuring your creations stand out in the bustling Roblox universe. Dive in to elevate your building skills and create more professional-looking games and assets today, making your valuable gaming time count.
Q: How do I properly center a UI element in Roblox Studio using AnchorPoint?
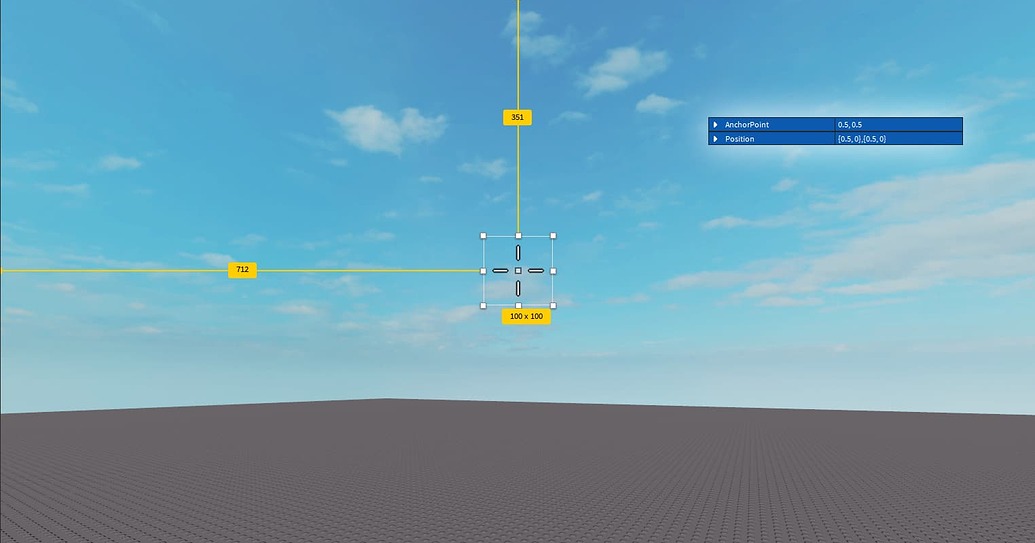
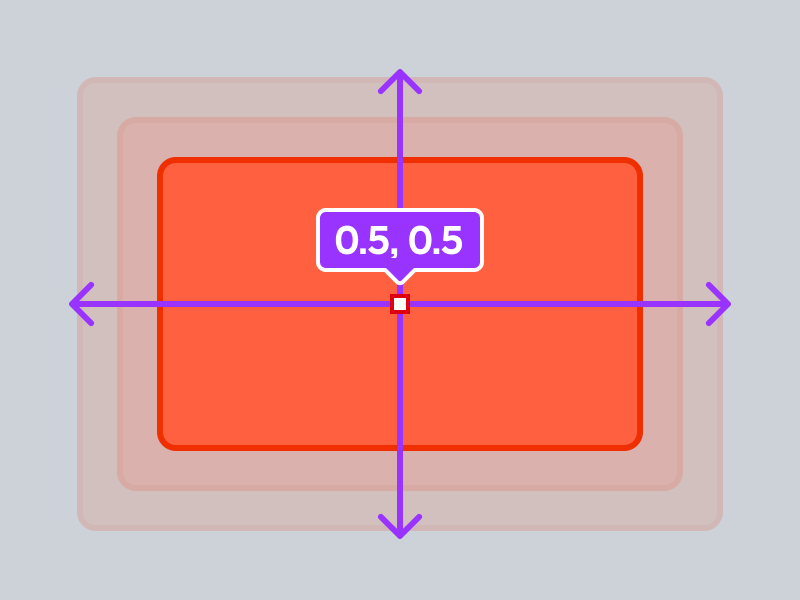
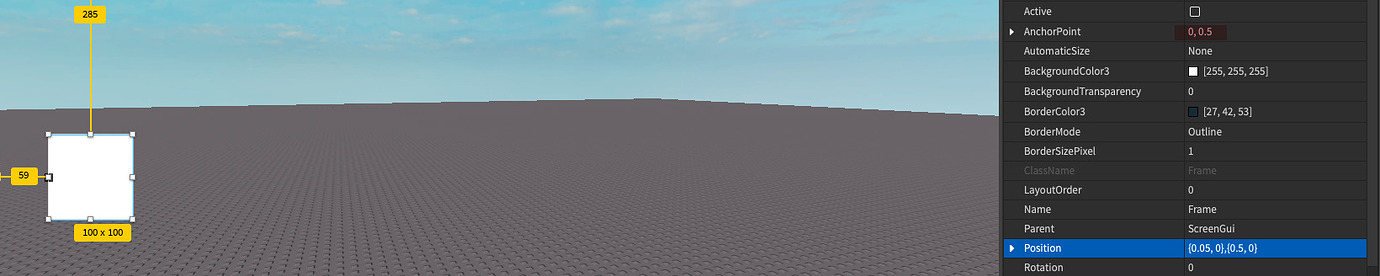
A: To perfectly center a UI element in Roblox Studio, you need to set its AnchorPoint position Roblox to (0.5, 0.5) and its `Position` property to {0.5, 0}, {0.5, 0}. The AnchorPoint (0.5, 0.5) tells the UI element to consider its own geometric center as its pivot point. Then, setting the `Position` to {0.5, 0}, {0.5, 0} (which is 50% across the parent's width and 50% down the parent's height, with zero offset) aligns that pivot point with the exact center of its parent container. This combination ensures the element remains centered regardless of screen size or aspect ratio, a lifesaver for responsive design and common pain points where UI elements appear off-center for players on different devices.
Q: Why is my UI element moving unexpectedly when the screen size changes, and how can AnchorPoint fix it?
A: Your UI element is likely moving unexpectedly because its anchorpoint position Roblox is still at the default (0,0) (top-left) while its `Position` property is set using scale values. When the screen resizes, the top-left corner of the parent container shifts relative to your UI's internal origin, causing the entire element to appear to 'slide.' To fix this, identify where you want the UI element to 'stick' relative to its parent. If you want it anchored to the top-right, set AnchorPoint to (1,0) and adjust its position accordingly (e.g., {1,0}, {0,0}). If you want it always centered, use AnchorPoint (0.5,0.5) and Position {0.5,0},{0.5,0}. This ensures the element's chosen anchor point stays locked to its relative position on the screen, providing stability and predictability, crucial for a smooth user experience, especially on diverse devices.
Q: What is the primary difference between AnchorPoint and the Position property for a GuiObject?
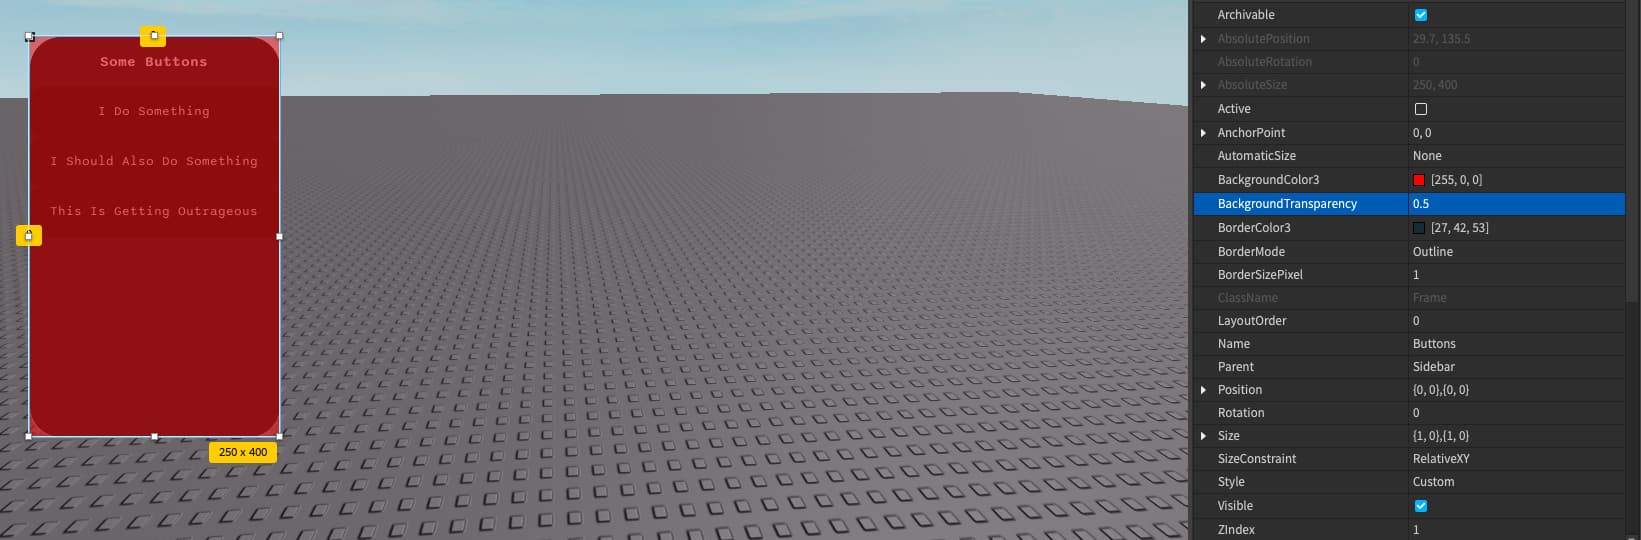
A: The primary difference is that `AnchorPoint` defines the *internal pivot point* of a `GuiObject`, while `Position` defines *where that pivot point is located* relative to the object's parent. Think of AnchorPoint as telling the object 'where is *my* center of gravity,' and Position as telling it 'where should *that center of gravity* be placed.' For instance, an AnchorPoint of (0,0) means the object's top-left corner is its origin, while (0.5,0.5) means its very center is the origin. The Position property then uses these origins. This distinction is crucial for crafting responsive UIs, as misinterpreting it often leads to setup issues where elements won't align as intended, eating into your limited game development time.
Q: Can AnchorPoint be used to control the rotation of UI elements in Roblox?
A: Indirectly, yes. While anchorpoint position Roblox doesn't directly dictate the rotation angle itself (that's handled by the `Rotation` property), it defines the *point around which the rotation occurs*. If your AnchorPoint is (0,0), the UI element will rotate around its top-left corner. If you set AnchorPoint to (0.5, 0.5), it will rotate around its true center. This is vital for creating smooth, visually pleasing animations, such as a spinning gear or a fading transition, where you want the object to spin from its geometric middle. Without correctly setting the AnchorPoint, your rotations might appear off-kilter or less professional, impacting the overall polish of your game experience.
Q: How does AnchorPoint contribute to creating a responsive UI for mobile and PC players?
A: AnchorPoint position Roblox is absolutely fundamental for creating a truly responsive UI that adapts seamlessly across mobile phones, tablets, and PCs. By setting the AnchorPoint, you define a fixed reference point within the UI element itself. When combined with `Position` values that use *scale* (percentages of the parent's size), the UI element will consistently maintain its relative position on any screen. For example, an AnchorPoint of (1, 1) and a Position of {1, 0}, {1, 0} will always keep the bottom-right corner of your UI element exactly at the bottom-right of the screen, regardless of the device's resolution. This prevents elements from being cut off or looking stretched, ensuring all players have an optimal experience, which is paramount for gamer who values a polished, accessible game.
Q: Are there any specific performance benefits or drawbacks related to AnchorPoint usage?
A: Using anchorpoint position Roblox correctly offers indirect but significant performance benefits in terms of user experience and potentially reducing layout calculations. When UI elements are anchored and positioned correctly using scale, the Roblox engine can more efficiently calculate their final positions and sizes across different resolutions. This leads to a smoother, more stable UI without constant re-adjustments, which can be particularly noticeable on lower-end mobile devices where every bit of optimization counts. Conversely, a poorly configured UI that relies heavily on offsets or requires frequent recalculations due to incorrect anchoring might contribute to minor performance problems, especially during screen resizing or complex UI animations. Therefore, proper AnchorPoint usage helps create a snappier, more enjoyable game, aligning with the goal of performance optimization for busy gamers.
Q: What tools or features in Roblox Studio can help visualize AnchorPoint better?
A: Roblox Studio offers several ways to help visualize and debug anchorpoint position Roblox. The most direct method is by selecting a `GuiObject` in the Explorer and observing its `AnchorPoint` property in the Properties window. While Studio doesn't draw an explicit 'X' at the AnchorPoint, you can infer its location. For better visualization, you can temporarily enable `BorderMode` on the UI element or its parent, or set a distinct `BackgroundColor` and `Size` to clearly see the boundaries. Additionally, using the 'Test' tab's 'Devices' emulator feature is invaluable. This allows you to rapidly switch between various screen resolutions and aspect ratios (like Phone, Tablet, PC) to immediately see how your AnchorPoint and Position choices affect the UI layout dynamically. This hands-on testing is crucial for ensuring your responsive UI works as intended for every player, balancing fun and functionality.
Ever spent precious gaming time in Roblox Studio, meticulously placing objects, only to watch them tumble or shift unexpectedly the moment your game runs? It's a common frustration, especially for busy adult gamers who carve out time between work and family responsibilities to pursue their creative passion. You're not alone. Many developers, both new and experienced, struggle with parts that just won't stay put or UI elements that refuse to scale correctly across different screen sizes. This isn't just about aesthetics; it's about the core stability and functionality of your game. Imagine a carefully constructed bridge collapsing or a critical button appearing off-screen for a player these are the headaches that steal away valuable relaxation and creative moments.
The solution often lies in a fundamental yet frequently misunderstood property: the anchorpoint position Roblox provides. Mastering anchorpoint isn't just a technical skill; it's a way to reclaim your time, reduce development stress, and ensure your Roblox creations are robust and performant. With over 87% of US gamers engaging regularly, often for 10+ hours a week, and mobile gaming continuing its dominance in 2026, creating reliable and visually consistent experiences is more important than ever. This guide is crafted for you the dedicated gamer and developer who values efficiency, quality, and a smooth creative process. We'll demystify anchorpoint position, offering practical advice and step-by-step instructions to help you build stable worlds, perfect your UI, and make every moment in Roblox Studio more productive and enjoyable. Let's dive in and elevate your Roblox development game!
What Exactly is AnchorPoint Position in Roblox?
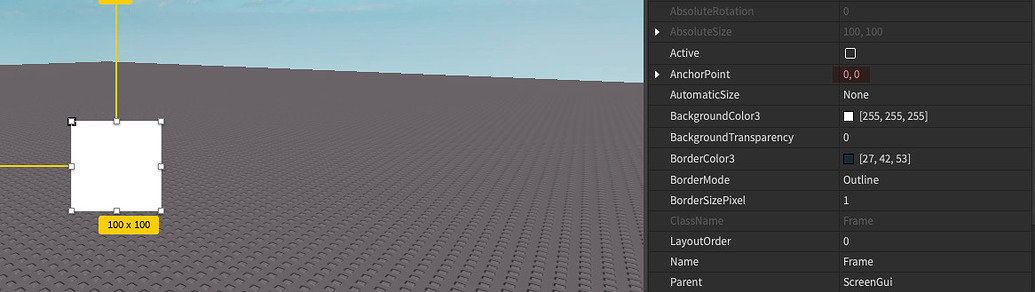
The anchorpoint position in Roblox determines the origin or pivot point for an object's transformations and positioning, particularly for GUI elements and, by extension, how physical parts might interact with UI. Think of it as the specific spot on an object that 'sticks' to its parent or a reference point within itself. For a GUI object like a Frame or TextButton, setting its AnchorPoint to (0.5, 0.5) centers it precisely on its `Position` property. Without understanding this, your UI might float off-screen, or parts might appear to shift from unexpected locations relative to their intended placement, leading to common setup issues and performance problems. It's a critical concept for achieving predictable behavior and layout control in your games, ultimately saving you from constant, frustrating adjustments and allowing you to spend more time enjoying your creations or social gaming.
For gamers balancing jobs and families, time is a precious commodity. Understanding AnchorPoint means you spend less time debugging misaligned UI and more time building engaging gameplay or simply unwinding with friends. This knowledge is a fundamental skill that underpins much of Roblox's professional development, ensuring your efforts translate into stable, visually appealing experiences that enhance relaxation and fun.
Why is Understanding AnchorPoint Crucial for Roblox Developers?
Understanding anchorpoint position Roblox is absolutely vital for several reasons, especially if you're aiming for polished, professional-looking games that stand out in 2026. Firstly, it provides precise control over UI placement and scaling, ensuring your game looks consistent across various devices, from high-end PC monitors to diverse mobile screens a crucial factor given mobile's continued dominance in gaming and the importance of cross-play compatibility. Many busy adult gamers primarily interact with Roblox on their phones, so a responsive UI is non-negotiable for a good user experience.
Secondly, it prevents frustrating glitches where UI elements shift unexpectedly or appear off-screen, a common pain point for developers trying to balance gaming with a busy life. Imagine building a complex inventory system, only to have it break visually when a player switches from desktop to mobile. That's a huge time drain. Thirdly, for physical parts, while less directly linked than for UI, it influences how you conceptually align and position elements within a parent, making construction more intuitive. Mastering this property means less debugging, improved performance optimization, and more time enjoying your creative flow and building skills, ultimately providing greater value for your development efforts.
How Does AnchorPoint Affect UI Elements in Roblox Studio?
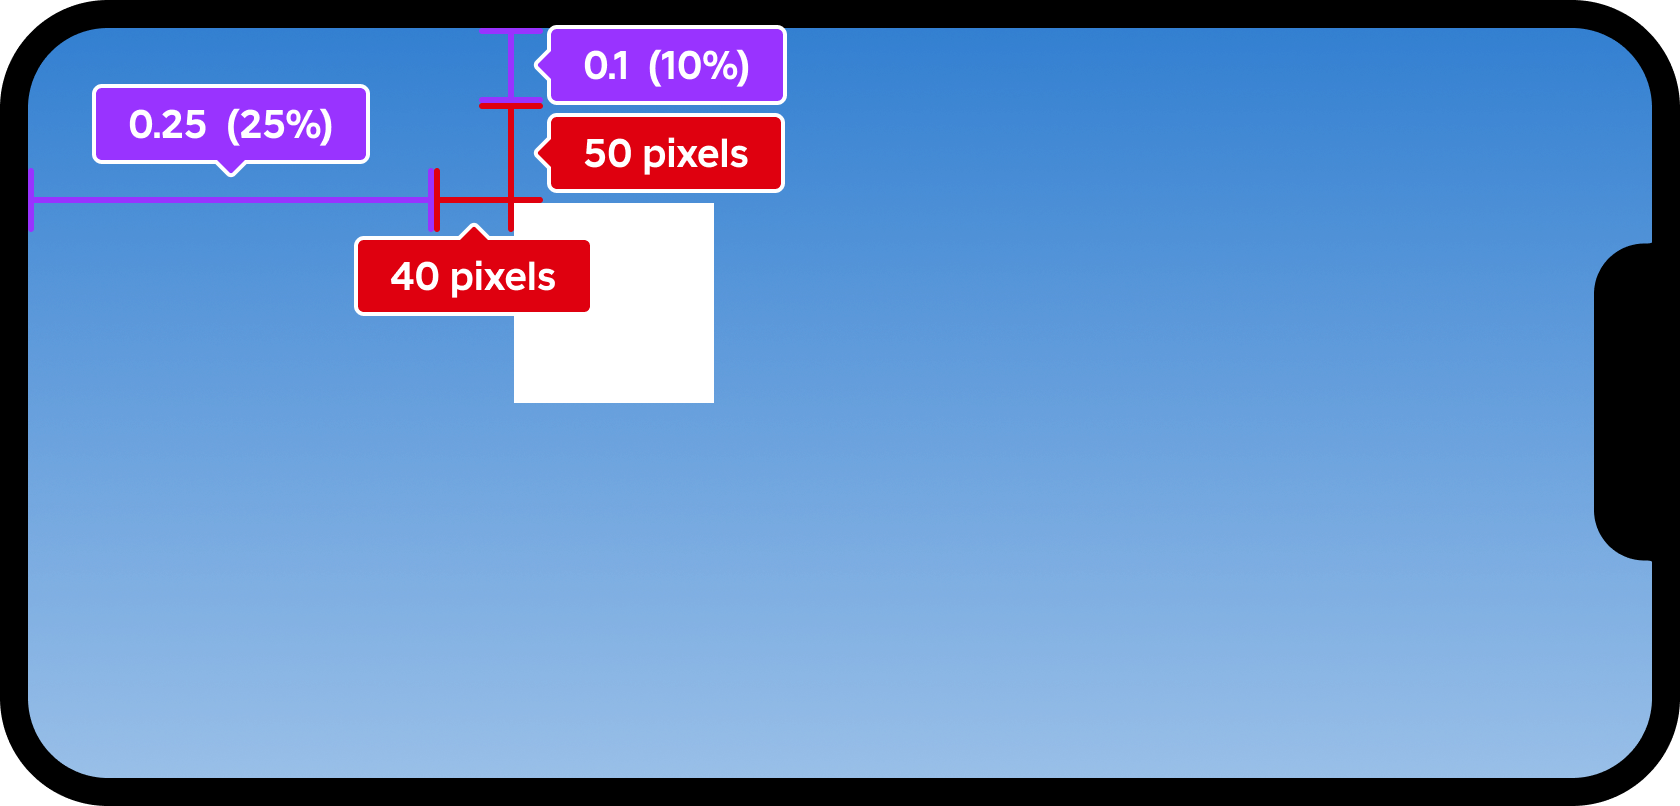
For User Interface (UI) elements, the anchorpoint position Roblox property works hand-in-hand with the 'Position' property to determine an element's final placement. The 'Position' property dictates where the anchor point itself is located on the screen relative to the parent container, typically using a combination of scale and offset. For example, if you set a Frame's Position to {0.5, 0}, {0.5, 0} and its AnchorPoint to (0.5, 0.5), the Frame will be perfectly centered on the screen, because its own center (the AnchorPoint) is aligned with the parent's center (the Position). If you kept the AnchorPoint at the default (0,0) (top-left), the Frame's top-left corner would be centered instead, pushing the rest of the UI element down and to the right, creating a misalignment.
This synergy is key for responsive UI design that adapts gracefully to different resolutions and aspect ratios, ensuring your game is accessible and enjoyable for everyone, regardless of their device. Properly managing AnchorPoint helps prevent common setup issues where UI looks great on your development screen but breaks for other players, which is a major concern for developers who want to deliver polished experiences without constant updates or patches.
What are Common AnchorPoint Values and Their Uses?
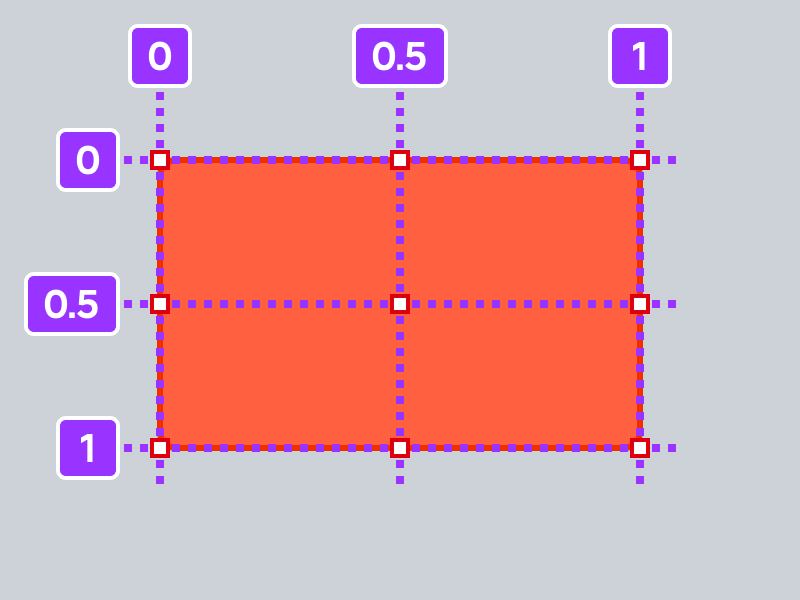
The most common anchorpoint position Roblox values range from (0,0) to (1,1), representing the normalized coordinates within an object. These values are fractions, where 0 means the far left/top edge, 0.5 means the center, and 1 means the far right/bottom edge. Here are some widely used settings and their practical applications:
- (0,0): Default top-left corner. Useful for traditional top-down UI layouts where elements originate from the top-left, such as a basic inventory grid or a debug console.
- (0.5, 0): Top-center. Great for titles, banners, or progress bars that need to be centered horizontally at the top of the screen, ensuring they look balanced on any display.
- (1, 0): Top-right corner. Ideal for minimaps, notification icons, or menu buttons designed to stick to the top-right of the screen, providing consistent placement for critical information.
- (0, 0.5): Middle-left. Good for side panels or navigation menus that align centrally on the Y-axis along the left edge, useful for in-game settings or player lists.
- (0.5, 0.5): Center. The go-to for centering UI elements both horizontally and vertically. Essential for pop-ups, main menus, loading screens, or player health bars, offering maximum responsiveness.
- (1, 0.5): Middle-right. For side elements like quest logs or social feeds aligned centrally on the Y-axis along the right edge.
- (0, 1): Bottom-left corner. Useful for chat boxes, action bars, or persistent status UI elements anchored to the bottom-left of the screen.
- (0.5, 1): Bottom-center. Perfect for primary action bars, character controls, or quick-slot interfaces centered at the bottom, making them easily accessible.
- (1, 1): Bottom-right corner. For player statistics, inventory icons, or power-up displays that need to remain fixed at the bottom-right corner.
Choosing the right AnchorPoint simplifies positioning, reduces the complexity of UI scripts, and makes your UI far more robust against screen size changes, which is a major time-saver for busy developers and a significant win for overall game performance and player satisfaction.
Can AnchorPoint Position be Used for Physical Parts in Roblox?
While anchorpoint position Roblox is primarily associated with UI elements (GuiObjects) and their `Position` property, it's less directly applicable to physical `BaseParts` in the same way. For `BaseParts`, their `Position` property refers to the center of the part's bounding box. However, the concept of a 'pivot point' is still crucial for parts, especially when it comes to rotation, welding, and precise placement within larger models. Developers often manipulate a part's `CFrame` (Coordinate Frame), which includes position and orientation, to achieve precise placement and rotation from a specific origin point. Tools like `PivotTo` or `SetPrimaryPartCFrame` for models offer similar control over an object's 'origin' for transformations. For instance, when building a rotating fan, you'd adjust its `CFrame` to ensure it rotates around its central axis, not an arbitrary corner. For advanced building, understanding a part's `CFrame` and pivot manipulation is analogous to understanding AnchorPoint for UI, offering similar levels of control and stability for your 3D creations. This deep understanding helps avoid structural issues and performance problems in your game's physical world, allowing for more complex and reliable mechanics.
How to Optimize UI Scaling with AnchorPoint and Position?
Optimizing UI scaling with anchorpoint position Roblox involves a strategic combination of properties to achieve a truly responsive and adaptable interface. The key is to leverage `AnchorPoint` to define the internal pivot of your UI element (e.g., (0.5, 0.5) for a central element) and then use the `Position` property primarily in **scale** (UDim2.new(XScale, XOffset, YScale, YOffset)) rather than offset. For example, setting a UI element's `Position` to {0.5, 0}, {0.5, 0} with an `AnchorPoint` of (0.5, 0.5) ensures its center stays in the exact center of the screen, regardless of the player's resolution. This approach is superior because scale values are percentages of the parent's size, guaranteeing proportional adjustments.
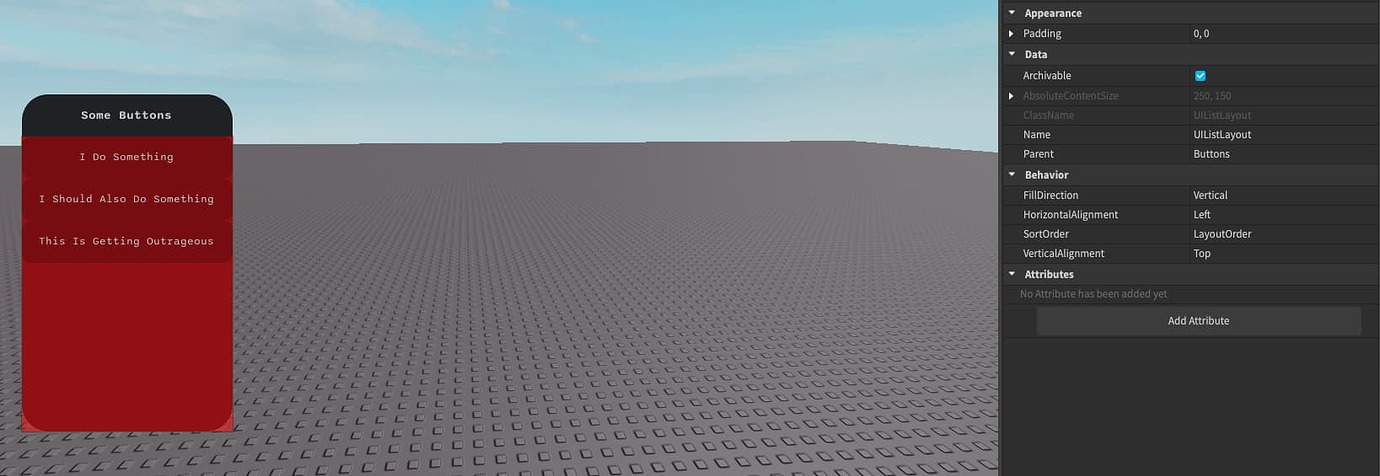
To further enhance responsiveness, consider using `UiAspectRatioConstraint` to maintain an element's width-to-height ratio, preventing distortion. For dynamic lists or grids, `UiListLayout` or `UiGridLayout` automatically manages spacing and arrangement, adapting elements intelligently without manual calculation. By embracing these tools and relying on scale-based positioning with appropriate AnchorPoints, you minimize setup issues, reduce performance problems related to UI redrawing, and allow your game to look fantastic on any device. This means less time debugging and more time for actual gameplay or creative pursuits, aligning perfectly with what busy gamers value most.
Are there Any Best Practices for Using AnchorPoint Position?
Absolutely! Implementing best practices for anchorpoint position Roblox can significantly streamline your development process, reduce common headaches, and lead to a more polished game. Firstly, always define your AnchorPoint *before* adjusting the Position property for any UI element. This establishes a stable reference point from the start. For central elements like main menus or pop-ups, an AnchorPoint of (0.5, 0.5) is almost always the best choice, ensuring universal centering. For elements meant to stick to corners (e.g., a top-right leaderboard or minimap), use the corresponding AnchorPoint (e.g., (1,0) for top-right) and match the Position scale accordingly.
Secondly, avoid mixing offset and scale values indiscriminately within the Position property; lean heavily on *scale* for responsive design, especially for elements that need to adapt to different screen sizes. Using too many offsets can lead to UI breakage on varied resolutions. Thirdly, extensively test your UI on various screen resolutions and aspect ratios using Roblox Studio's built-in emulator (found under the 'Test' tab > 'Devices'). This allows you to catch inconsistencies early, before they become a pain point for players. Consistent and thoughtful use of AnchorPoint across your UI will result in a much cleaner, more maintainable, and visually appealing game that respects players' diverse hardware, reflecting modern gaming trends for accessibility and quality.
What are Common Mistakes to Avoid When Setting AnchorPoint?
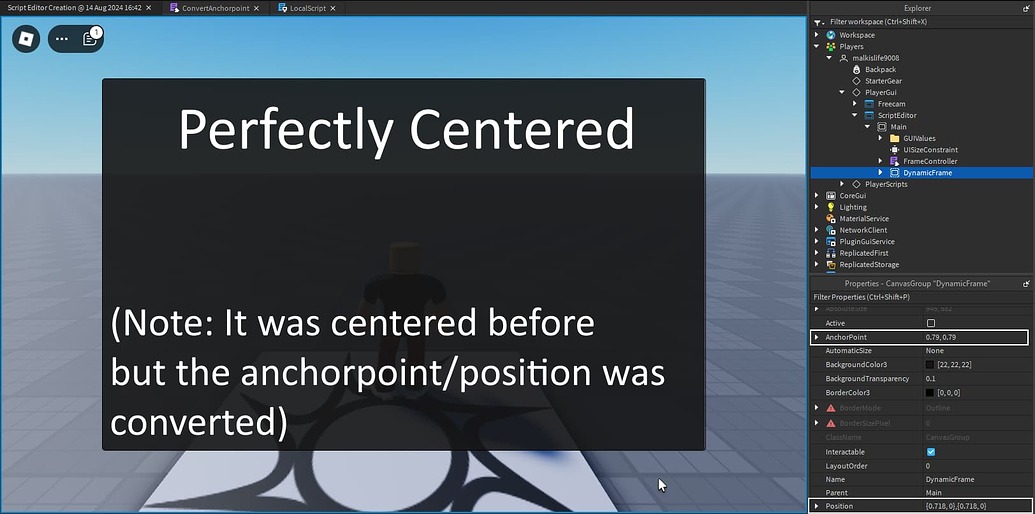
One of the most frequent mistakes when dealing with anchorpoint position Roblox is ignoring it entirely. This often leads to UI elements that appear misaligned, overlap unexpectedly, or scale poorly across different screens, creating setup issues that frustrate both developers and players. Another common pitfall is changing the Position property without considering the AnchorPoint, causing elements to jump to unexpected locations as their pivot point shifts. Forgetting to set AnchorPoint to (0.5, 0.5) when attempting to truly center an object is also a frequent oversight, resulting in elements that are off-center despite scale positioning.
Developers sometimes also mistakenly try to apply AnchorPoint directly to physical parts in the same way they would for UI, leading to confusion. Remember that for physical parts, `CFrame` manipulation and pivot adjustments are the correct tools. Furthermore, relying too heavily on pixel `Offset` values in the `Position` property instead of `Scale` values will make your UI rigid and non-responsive, defeating the purpose of AnchorPoint for adaptable design. Avoiding these common errors means less time debugging and more time building awesome, stable experiences that players, especially those balancing life with gaming, will appreciate for their polish and reliability.
Can AnchorPoint Impact Game Performance in Roblox?
While anchorpoint position Roblox itself doesn't directly cause significant performance drains on the scale of complex scripts or heavy physics, inconsistent or poorly managed UI layouts can indirectly affect user experience and, in extreme cases, contribute to minor frame rate dips, especially on lower-end mobile devices. If your UI frequently shifts, resizes, or recalculates its layout due to improper AnchorPoint and Position settings, the game engine has to perform additional computations to redraw and reposition elements. This constant re-evaluation can be a subtle drain, particularly for mobile players, who comprise a large segment of the Roblox user base and often have less powerful hardware. In 2026, where smooth performance on diverse devices is expected, optimizing every aspect of your game is crucial.
By using AnchorPoint correctly for stable and predictable UI, you reduce the processing overhead associated with layout changes, leading to smoother UI rendering and overall better performance. An optimized UI means players spend less time waiting for elements to load or reposition, enhancing overall game flow and enjoyment. For busy adults who game to unwind, a seamless and high-performing game is key to their relaxation and immersion, making proper AnchorPoint usage an important part of performance optimization.
How Do I Debug AnchorPoint Issues in Roblox Studio?
Debugging anchorpoint position Roblox issues often involves a systematic approach, much like solving a puzzle to reclaim your valuable development time. First, select the problematic UI element in the Explorer and meticulously check its `AnchorPoint` and `Position` properties in the Properties window. Visualize where the AnchorPoint is located relative to the UI element's own boundaries, and then where that AnchorPoint is placed on its parent container. A common technique for better visualization is to temporarily set a distinct `BackgroundColor` for your UI element and its parent, or add a `UIStroke`, allowing you to clearly see their borders and how they interact.
Next, make extensive use of Roblox Studio's built-in emulator, found under the 'Test' tab > 'Devices'. This feature is invaluable as it allows you to rapidly preview your UI on various screen sizes and aspect ratios (e.g., Phone, Tablet, PC) without needing to publish your game. Look for unexpected shifts, overlaps, or misalignments. If an element is misbehaving, try resetting its `AnchorPoint` to (0,0) and its `Position` to {0,0},{0,0}, then carefully adjust them step-by-step, observing the changes. Sometimes, simplifying the parent-child hierarchy can also reveal the source of the problem. Patience and methodical testing are your best tools here, transforming frustrating setup issues into solvable challenges and getting you back to creating fun experiences.
Mastering anchorpoint position Roblox isn't just another technical detail; it's a fundamental skill that empowers you to build more stable, professional, and visually consistent games. For the busy gamer who juggles work, family, and a passion for creation, understanding AnchorPoint means less time wrestling with unpredictable UI and more time enjoying the creative process and sharing polished experiences. We've explored how AnchorPoint dictates the origin for UI elements, prevents unexpected shifts, and is essential for responsive design across diverse devices. By applying these insights and best practices, you're not just fixing a minor glitch; you're optimizing your development workflow, enhancing game performance, and ensuring your creations resonate with a broad audience.
In a gaming landscape where consistency and accessibility are paramount, particularly with mobile gaming's massive user base and the desire for seamless social experiences, your attention to detail with AnchorPoint sets your projects apart. It allows you to build games that offer stress relief and skill-building in a reliable, enjoyable format. So go forth, experiment, and transform your Roblox builds into robust, player-friendly worlds that provide real value. What's your biggest gaming challenge when it comes to UI or object stability? Comment below!
FAQ: Advanced AnchorPoint Questions
Q: Does AnchorPoint affect the ZIndex of UI elements?
A: No, AnchorPoint specifically controls an element's positional origin. ZIndex is a separate property that determines the stacking order of UI elements on the same plane, dictating which element appears on top when they overlap, regardless of its AnchorPoint setting.
Q: Can I animate the AnchorPoint property in Roblox?
A: While you can't directly tween AnchorPoint with a simple `TweenService` call, you can programmatically change it in a script over time. However, it's generally more common and visually smoother to animate the `Position` property (often combined with `Size`) while keeping the AnchorPoint fixed to achieve desired movement effects for UI elements.
Q: Is AnchorPoint automatically adjusted by Roblox in any scenarios?
A: AnchorPoint is typically static once set and not automatically adjusted by the Roblox engine unless explicitly changed via a script or by the developer in Studio. However, other UI properties like `Scale` and `Offset` in the `Position` UDim2 value will cause the element to resize or reposition relative to its parent and its AnchorPoint.
Q: What's the difference between AnchorPoint and Pivot Offset for parts?
A: AnchorPoint defines the origin for UI element positioning. Pivot Offset (now often managed through `PivotTo` or `WorldPivot`) defines the rotation and scaling origin for physical parts and models. While both define a "pivot," their application areas (UI vs. 3D models) and specific implementations differ significantly in Roblox Studio.
Q: Should I always use AnchorPoint (0.5, 0.5) for everything?
A: Not always. While (0.5, 0.5) is excellent for centering, using it for *every* element can complicate alignment if you need something to stick to a corner or edge. For instance, a top-right minimap should use AnchorPoint (1,0) to ensure it stays in that corner when the screen resizes. Choose the AnchorPoint that best suits the element's intended position and responsiveness.
Q: Does AnchorPoint apply to accessories or character models?
A: AnchorPoint, in the context of `GuiObject` positioning, does not directly apply to accessories or character models. For 3D models and parts, their positioning and rotational origin are controlled by their `CFrame` and, more recently, their `WorldPivot` property, which offers a similar concept for 3D manipulation.
Essential for stable Roblox builds, impacts UI and parts, prevents unintended movement, crucial for smooth animations, optimizes object behavior, improves responsive design, reduces development pain points, enhances game polish and user experience.
35


UI Positioning For Dummies Using Anchor Points Effectively Common . Introducing AnchorPoint Change Your Gui S AnchorPoint With Ease . How To Keep The Original Position When Changing The Anchor Point . How To Keep The Original Position When Changing The Anchor Point . Moving A GUI Anchor Point Scripting Support Developer Forum Roblox 2 463x500


Posicionar E Dimensionar Objetos De UI Documenta O Central De Anchor Points . UI Positioning For Dummies Using Anchor Points Effectively Common . Ancherpoint And Position Art Design Support Developer Forum Roblox . UI Positioning For Dummies Using Anchor Points Effectively Common . Anyway I Can Convert A Position To Support An Anchor Point Art


UI Positioning For Dummies Using Anchor Points Effectively Common 2 1035x292 . UI Positioning For Dummies Using Anchor Points Effectively Common 2 690x177 . UI Positioning For Dummies Using Anchor Points Effectively Common 2 690x272 . Anchor Presets Speed Up Your Anchor Point Workflow Community . UI Positioning For Dummies Using Anchor Points Effectively Common


AnchorPoint Not Affecting Issues . Posicionar Y Dimensionar Objetos UI Documentaci N Del Centro De GuiObject AnchorPoint . How To Scale And Position UI The CORRECT Way Community Tutorials 2 1035x543 . UI Positioning For Dummies Using Anchor Points Effectively Common . UI Positioning For Dummies Using Anchor Points Effectively Common 2 1380x476


UI Positioning For Dummies Using Anchor Points Effectively Common 2 690x207 . Position And Size UI Objects Roblox Creator Hub Anchor Point Scaling . Tips For Positioning And Sizing UI Elements Easily And Efficiently . CAPA Frame Anchor Point Conversion Community Resources Developer 2 1035x514 . How To Keep The Original Position When Changing The Anchor Point


UI Positioning For Dummies Using Anchor Points Effectively Common . Introducing AnchorPoint Change Your Gui S AnchorPoint With Ease . Definitive Guide To Roblox 2026 TM 07169 Definitive Guide To Roblox 2026 . AnchorPoint Have Broken Poor Behavior Engine Bugs . Roblox Unveils Homepage Ad Format At CES 2026 Outlook Respawn Image 1200x630 2026 01


How To ANCHOR A Part In Roblox Studio TUTORIAL YouTube . UI Positioning For Dummies Using Anchor Points Effectively Common 2 1380x276 . Objets D Interface Utilisateur De Position Et De Taille Scale Offset Positioning . Anchor Point Rotation Scripting Support Developer Forum Roblox . Roblox Me Command What Does It Actually Do NoFilter